 | ||||||||||
|
Introduction | ||||||||||
|
A cloth is a set of particles linked by springs. The stiffnesses of the springs
and the masses of the particles define the properties of the cloth. Any polygonal mesh can be converted to a cloth by using the "Create Cloth" item in the Syflex menu. For instance, from the following mesh:  Syflex creates the following springs:  There are 3 kind of springs:
| ||||||||||
|
Skin | ||||||||||
A skin is a layered cloth. Layers are connected with springs: Here a sySkin with 2 layers. All layers must be topologically identical (same numbers of vertices, faces ...). Each layer has the same springs as a syCloth. There are two kind of springs between the layers:
 To vizualise these springs, use the value 2 in the Show Springs attribute. There are two ways of connecting the layers together:  On the left each layer is connected to the next layer. On the right each layer is attached to the top layer. This allows to have many muscles influence the skin. The Layers attribute is used to select the connection. The bottom layers can have springs on their surface or not. This is controled by the attribute Bottom Free. This is useful to attach the bottom layer of the skin to another mesh. Appart from that, the skin has the same attributes as the cloth. To create a sySkin: - select all the shapes (one shape per layer, the order matters). - call Syflex > Cloth > Create Skin. The influence of each layer of springs is weighted by the attributes: LayerWeight[i] | ||||||||||
|
Flesh | ||||||||||
|
A syFlesh is a closed cloth (like a balloon) with built-in springs inside to help maintain the volume. The surface of the flesh is controled in the same way as a cloth. Inside the flesh are additional springs, controlled by the parameters:
- select the shape - call Syflex > Cloth > Create Flesh. The Subdivisions attribute defines the number of subdivisions created inside the volume. To visualize the internal vertices, set the stretch visualization attribute to 2 or 3. | ||||||||||
|
Stiffness | ||||||||||
|
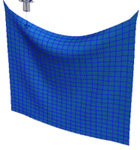
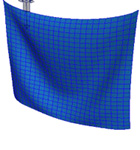
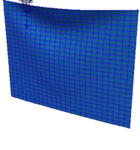
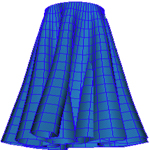
This defines the stiffness of the springs. There are 3 stiffness attributes:
one for each type of spring (stretch, shear and bend).
Common values range from 0 to 1. A smaller value for the bending stiffness
allows the surface to bend more. The following illustrates different behaviors obtained by changing the stiffnesses:
Check the animation, in this movie. In general, the stretching stiffness is higher than the other stiffnesses, followed by the shearing, and then by the bending. When you increase one of the stiffness parameters, you should also increase the associated damping. | ||||||||||
|
Damping | ||||||||||
|
When the cloth is very stiff, it is prone to vibrations. These
vibrations can be avoided using spring dampings. Be careful: increasing the damping
may increase the computation time. There are 3 damping attributes:
one for each type of spring (stretching, shearing and bending).
Common values range from 0 to 0.001. | ||||||||||
|
Mass Density | ||||||||||
|
This attribute defines the density of the cloth (= mass / surface). The total mass
of the cloth is its density times its surface. Using a density instead of a mass
allows to set the same properties for two clothes made of the same material. Here are a few examples of densities, depending on the units used (mass in grams):
| ||||||||||
|
Precision | ||||||||||
|
This is the precision of the simulation.
It takes values between 0 and 1.
The smaller the value, the higher the precision.
The default value for the precision is 0.001.
In some rare cases, when there is a lot of stress on the cloth, some vibrations
may appear. In this case you can decrease this parameter, to 0.0005 for instance. Tip: to increase the computation speed , increase this value. Be careful: this sometimes results in a less accurate simulation. Do not exceed 0.01: the simulation may become unstable. | ||||||||||
|
Active | ||||||||||
|
The simulation is computed only when this flag is set to 'on'.
When set to 'off' no simulation is computed. | ||||||||||
|
Start Frame | ||||||||||
|
The simulation begins at the frame specified by this attribute. Before this frame,
the cloth is not animated. It is not possible to jump directly to any
frame (except when using a cache: see the "Cache" attribute): the simulator needs to
compute all the frames in-between. If this happens,
the simulation can take a long time to finish. Use the "Esc" key to stop the
simulation. The default value is 0. It is always preferable to create the cloth when the current time is also 0. If not, the simulator will compute the simulation from time 0 to the current time, just after creating the cloth. | ||||||||||
|
Cache | ||||||||||
|
This attribute is the base name of files in which the simulation saves its
computation.
The first time, the simulation will save the positions
and velocities of the cloth in this file. When playing back, the simulation
is not computed: the state of the cloth is just read from the file.
The name of this file is the concatenation of the cache name and the frame
number: one file per frame is saved. You can remove any of these files: when playing the animation, if the file doesn't exist, it will be recomputed (and saved). The file name of the cache is relative to the current location. The cache is disabled when this field is empty. The cache saves only positions and velocities of the vertices of the cloth (no faces). You can find more details about the cache files and their use in the cache. You cannot see this attribute in the channel box, you need to open the attribute page (Ctrl-A). You can easily check which frames are saved : - Select the cloth - Call the mel command: syClothCacheGetFrames It returns (in a string) the saved frames, using the following format: - a frame number - or two numbers a:b meaning frames a to b You can also remove frames. For instance to remove frames 5 to 10 and frame 20: - Select the cloth - Call the mel command: syClothCacheDelFrames "5:10 20" To delete all the cache files: - Select the cloth - Syflex > Cache > Clear Cache To edit (manually) a frame in the cache, see save/read cache When no licenses are available, the simulator enters in "cache mode". In this mode no simulation is possible, but the cache files are read, allowing to see the previously computed simulation. This is useful during rendering (for ex: on a render farm), after computing the simulation. Syflex licenses are necessary to compute the simulation, but not for rendering. | ||||||||||
|
Self Envelope | ||||||||||
|
When set to a non-null value, self collisions are computed on the cloth.
Collisions are computed by using a volume around the cloth, called the envelope.
This attribute defines the size of the envelope for self collisions.
When a vertex of the cloth enters this volume, it is repelled outside of the
envelope. The parameter defines a size in world coordinates. A too small
value results in less accurate collision detections: if a vertex is moving
too fast, it will perhaps skip over the envelope. Testing for self
collisions is time consuming, use it only where necessary.
Tip: use the smallest possible envelope: this will speed up computations.
| ||||||||||
|
Self Side | ||||||||||
This allows to specify the orientation of the cloth for self collisions tests.
There are 3 cases:
| ||||||||||
|
Self Faces | ||||||||||
|
It is possible to refine the collision detection by specifying which faces can
collide.
The self-collision computations will be done only on these faces.
This can greatly improve the computation time.
To define which faces collide: first select these faces, then in the Syflex menu
select: Cloth > Set Self Collision Faces. To retrieve the faces used to compute self-collisions, use the following item in the menu: Cloth > Get Self Collision Faces. This selects the faces. You can modify them, and set them back in the cloth by using Set Self Collision Faces. | ||||||||||
|
Show Springs | ||||||||||
|
This attribute is used to visualize the springs. There are 3 values. One for
each kind of spring: stretch, shear and bend. A value of 1 displays the corresponding
spring. A value of 0 hides the spring. A value of 2 displays the inner springs of a skin (between layers). For stretching and shearing. 3 will display both. Each kind of spring is visualized with a different color. | ||||||||||
|
Show Stress | ||||||||||
|
This attribute is used to visualize the stress of the cloth, when set to a non-null value. This value multiplies the stress. Increase to make it visible.  To get the values of the stress, use the MEL command: syGetStress syCloth It returns the stress of each vertex (float $x[]); | ||||||||||
|
Rescale | ||||||||||
|
This attribute changes the rest length of the springs. Default is 1.0 (no rescale).
It can be used to shrink the cloth around the character, by setting it to a value
smaller than 1 (ex: 0.8). Because it rebuilds the springs, this attribute should be modified only at the first frame of the simulation. It cannot be animated. | ||||||||||
|
Tips | ||||||||||
|
Damping If you increase a spring stiffness parameter, also increase slightly the corresponding spring damping attribute. The spring damping avoid vibrations, but they don't "slow down" the motion as the global damping force. Setting the precision In most of the cases, the precision attribute doesn't need to be changed. It is a "non-dimensional" parameter: it doesn't depend on any units. To avoid any problems, just set it to 0.001 To increase the speed, set it to 0.01 Setting the mass You can get the total mass of the cloth, by using the Info item of the menu. Select the cloth node (not the shape associated to the cloth, but the cloth node itself) and select in the Syflex menu Info. This returns the total mass of the cloth. Pre-roll It is almost always necessary to begin the simulation before the first frame of the scene. This allows the cloth to adjust its position and speed to the animation of the character. 20 to 40 frames should be enough. You'll probably need to interpolate the movement of the character from a default static position, to its position at the beginning of the scene. Speed - Increase the precision (to 0.01). - Multiply the mass density by 2 (or 10) and divide the gravity by 2 (or 10). The resulting animation should be somehow similar, and faster. Don't expect the same result. - Try to restrict self-collisions only where necessary (using Set Self Collision Faces). Or remove it during some frames by animating the Self Envelope attribute (setting it to 0 removes self-collision computations). - If possible, use the Self Side attribute. Time The interval of time between 2 frames should always be 1. Cloth geometry Using a regular mesh for the cloth will result in a better animation (ie: don't use the result of a nurbs irregular subdivision). Coordinate system The simulator performs all its computation in world coordinates. So its better not to apply any transformation on the output geometry of the cloth node. | ||||||||||
|
Edit page | ||||||||||
|
You can access and edit all the forces and constraint parameters associated to a cloth
in one page. - Select the cloth - Syflex > Edit This opens a window where you can access all the simulation parameters on the cloth.  On all the forces, the select button selects the force node. On the Collision there is an additional button to select the collider shape. On the Pin there is an additional button to select the shape. | ||||||||||