Softimage|XSI
Antialiasing and Mental Ray v2
Aliasing
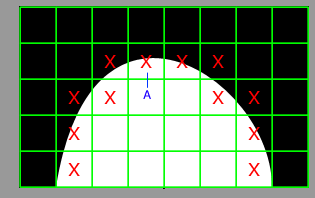
The green grid below represents an enlarged view
of an area of pixels. The white area is the geometry to be rendered. The rendering
software will calculate the colour at the point indicated by the red cross (or
"sample" point). The pixel is then set to this colour (only sample
crosses on pixels of interest are shown although, of course, all pixels are
sampled)
|
|
| Real geometry | Rendered geometry |
This results in the familiar "jaggies" or "aliasing".
Some of this is because of the finite resolution of the pixel grid. However the pixels are also the wrong colour. For example pixel A needs to be about 50% white - but is 100% white because of the position of the sample point.
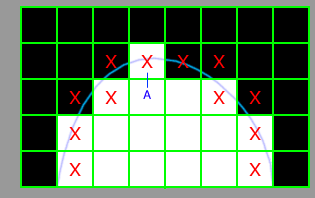
One solution is to take more samples (or supersample) in areas
where "jaggies" might occur (below). Pixel A
now has two "white" samples and two "black" samples and
is set to 50% white. The more samples that are taken the more accurate the colour.
 |
 |
| Supersample real geometry | Rendered geometry |
| Threshold | If the contrast between successive samples is greater than the Threshold value then supersampling is enabled (lower values lead to more sampling). |
| Filtering | Once all the samples are calculated they are combined using the chosen filter and the colours of the pixels are set. Filters can produce improved antialiasing and a generally more pleasing look. Too much and the image becomes blurred... |
| Jitter | The sample points are slightly randomly
displaced from the normal rigid grid. May help to reduce aliasing if scene contains regular structures . |
Example Min=0
Max=1 See diagram below.
Min = 0 initially one sample will be taken per pixel.
Max = 1 if supersampling is necessary the maximum
number of samples is 4 per pixel.
The sequence is as follows:
|
0
|
|
Mental ray will sample every pixel and compare it with surrounding samples. |
|
1
|
|
If the contrast between samples is higher than the Threshold value then the area will be subdivided and 4 more samples taken. |
|
These
samples:1 (no supersampling) up to 4 (maximum
supersampling) will be combined using the chosen filter to set the
colour of the pixel.
|
||
Example Min=-1
Max=1
Min = -1 initially one
sample will be taken per 4 pixel block.
Max = 1 if supersampling is necessary the maximum
number of samples is 4 per pixel (16 for the 4 pixel block).
The sequence is as follows:
|
-1
|
 |
Mental ray will calculate one sample for every 4 pixels and compare it with surrounding samples. |
|
0
|
 |
If the contrast between samples is higher than the Threshold value then the area will be subdivided and up to 4 more samples calculated. These will be compared with surrounding samples. |
|
1
|
 |
If the contrast between samples is higher than the Threshold value then the area will be subdivided and up to 16 samples calculated. |
| These samples: 1 (no supersampling) up to 16 (maximum supersampling) will be combined using the chosen filter to set the colours of the 4 pixels. | ||
Real world values...
Mental Ray recommends...
| Min | Max | |
| -2 | 0 | low-quality preview rendering |
| -1 | 1 | medium-quality rendering |
| 0 | 2 | high-quality renders |
| 1 | 3 | high-quality renders |
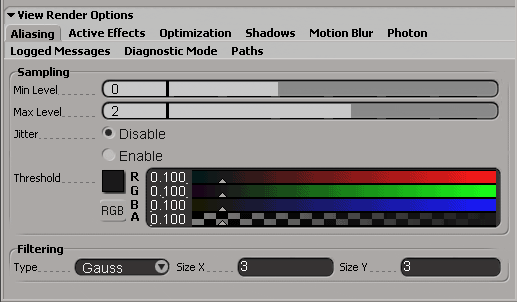
| Min 0 | Max 2 | Threshold 0.1 | Gausian 3,3 |
And change Threshold down towards 0.05 for more quality.
If fine features (wires, particles etc.) are missed try decreasing
threshold.
- then try increasing Max and then Min.
| Min -2 | Max 1 | Threshold 0.2 | Box 1,1 |
Or as low as you can stand...
Notes
Sampling
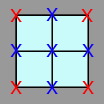
Mental Ray samples on pixel boundaries and not in the simplified way described
above.
So for Min= -1 the red crosses are initial samples. Blue crosses are
the next level of sampling.

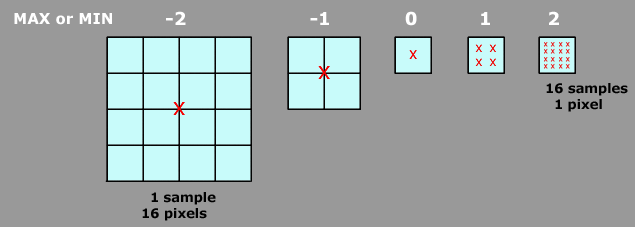
| -3 | 1 sample per | 64 pixels | (8x8) block |
| -2 | 1 sample per | 16 pixels | (4x4) block |
| -1 | 1 sample per | 4 pixels | (2x2) block |
| 0 | 1 sample per | 1 pixel | |
| 1 | 1 pixel per | 4 samples | (2x2) block |
| 2 | 1 pixel per | 16 samples | (4x4) block |
| 3 | 1 pixel per | 64 samples | (8x8) block |
All comments/complaints to:
![]()